Table of contents
A new beginning
About two years ago I chose to expose some of my doings to the Internet. The feeling was great. The first post reaction, even greater. I had felt a contribution to someone’s knowledge.
But, I was limited.
Medium, a platform that I had chosen, while serving its purpose, was constraining my abilities and imagination. It increased my visibility, but again, feature-wise it was lacking a lot. The formatting, styling and interactivity were not at the level which I needed.
I wrote a few posts, but the desire to write further content fell apart due to this.
Around that time, I was also looking at static site generators because I had never worked with one, so I decided to try out Gatsby, because it had quite a large community and was pretty simple to grasp.
So I began the quest of transferring my blog to this domain. Gatsby even had a blog starter kit to start things up quickly. I’ve already had experience with Netlify, so I knew I could host it for free and just had to pay for the domain.
After a couple of hours of breaking Gatsby and learning its way around GraphQL, CSS and React, I managed to make a custom theme to fit my needs and deployed my first self-produced blog.

And it sat there for about a year. With no sharing or new content.
Avoiding the graveyard
A couple of months ago I returned to this project and decided to make a full transition to Gatsby, sat down, gave myself a soft deadline till the end of 2022, made a GitHub Project board, wrote down tasks, prioritized them, and began crunching.
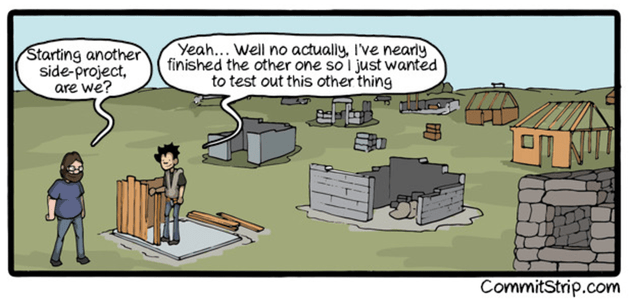
Since I also became a father in the last year, my time for side projects shifted to the very end of the day. The process was long but I was determined that this project doesn’t land in the GitHub Graveyard™️ as most of the developer side-projects do.

Exporting old posts
Since I had less than 10 posts, the export was simple even by manually copying and pasting text and downloading a couple of images from every post. If you have more content, I highly suggest using the Medium Exporter library.
Repository
Medium Exporter
Export your stories published on medium.com to markdown.
The Gatsby skeleton
The Gatsby blog template is driven by an architecture that relies on a directory structure. Below, you can see a standard directory structure that you get when you set up the blog boilerplate. This can be tweaked through code, of course.
- src
- components
- image-gallery.jsx
- external-link.jsx
- pages
- index.jsx
- about-me.jsx
- templates
- blog-post.jsx
- components
- content
- blog-post-1
- blog-post-2
- index.mdx
- header.jpg
- other-image.jpg
- static
- image.png
- video.mp4
- favicon.ico
The three main sections of a Gatsby blog project are:
src - stores all of your components, pages and single-page templatescontent - blog post content and store the post-specific static content
static - where all of the global static files lie
A plugin-based ecosystem
Almost anything that you think of has already been dealt by someone and developed into a Gatsby plugin. A Gatsby plugin is nothing more than an NPM package that is prepared to easily integrate into your Gatsby project by adding it into your gatsby-config.js and setting a few needed parameters.
For example, the usage of the gatsby-sentry-plugin is shown below.
Gatsby-config.jsjs
plugins: [{resolve: "gatsby-plugin-sentry",options: {dsn: "YOUR_SENTRY_DSN_URL",environment: process.env.NODE_ENV,enabled: true}}];
Some of the useful plugins that I’ve used during this migration are:
gatsby-plugin-imagegatsby-plugin-postcss
gatsby-plugin-alias-imports
gatsby-source-filesystem
@sentry/gatsby
gatsby-plugin-mdx
gatsby-remark-copy-linked-files
gatsby-remark-slug
gatsby-remark-reading-time
gatsby-remark-prismjs
gatsby-transformer-sharp
gatsby-plugin-sharp
gatsby-plugin-page-progress
gatsby-plugin-gdpr-cookies
gatsby-plugin-firebase-v9.0
gatsby-plugin-feed
gatsby-plugin-manifest
gatsby-plugin-react-helmet
gatsby-plugin-gatsby-cloud
ZeroCSS policy
Gatsby uses a pretty basic React setup so I’m not going to mention anything specific about it. I’ve had my share of React projects to feel at ease with it.
But one thing I will mention that I explored during the last year is TailwindCSS. I’ve worked my way through Foundation, Bootstrap, Materialize and other CSS frameworks, but in my opinion, none of them are up to par with what Tailwind offers. Everything I wanted, I could achieve by only placing intuitive TailwindCSS classes on HTML elements. They’ve got it all covered. Flex, grid, typography, colors, rows, columns, effects, filters, animations, tables, transforms, components,…
Even the file tree rendered a few scrolls above is just plain HTML enriched with Tailwind classes.
All you need to do is to create a tailwind.config.js file and point it to your JSX files in which you use the classes.
tailwind.config.jsjs
module.exports = {content: ["./src/pages/**/*.{js,ts,jsx,tsx}","./src/components/**/*.{js,ts,jsx,tsx}","./src/templates/**/*.{js,ts,jsx,tsx}","./src/utils/**/*.{js,ts,jsx,tsx}","./src/constants/**/*.{js,ts,jsx,tsx}"],theme: {extend: {}},variants: {extend: {},},plugins: [require("@tailwindcss/typography")]};
During the build phase, the Tailwind core then parses these files and creates one CSS file which contains only the style definitions that you used in your project.
No more bloated CSS files!
A new way to write content
Every post I transferred from Medium had to be in a separate MDX file. These are special kinds of markdown files that also support the JSX syntax. Each post consists of two parts, the header and the content.
Simple blog postmdx
---title: Lorem Ipsumdate: "2021-04-21T22:12:03.284Z"description: "Lorem ipsum dolor sit amet, consectetur adipiscing elit..."---### Some headerLorem ipsum dolor sit amet, consectetur adipiscing elit. Duis vel congue diam, ac congue diam. Duis ut nulla non sapien vehicula sagittis sed eget lectus.
In the code snippet above you see a minimal MDX file which is presented to you when you create a Gatsby blog from a template. I wanted a couple more features on my blog, like post publishing, gallery, and defining my components which you can see in the right sidebar on former blog posts. Below, you can see my modified MDX template.
Custom blog postmdx
---title: Lorem Ipsumdate: "2021-04-21T22:12:03.284Z"description: "Lorem ipsum dolor sit amet, consectetur adipiscing elit..."featuredImage: './header.jpg'featuredImageAlt: "header image description"tags:- "tag1"- "tag2"- "tag3"components:- "component1"- "component2"- "component3"gallery:-image: 'imagePath1'alt: 'image1 description'-image: 'imagePath2'alt: 'image1 description'-image: 'imagePath2'alt: 'image1 description'published: true---# JSX componentsimport ExternalLink from 'components/blog/post/external-link'import ComponentLink from 'components/blog/post/component-link'### Some headerLorem ipsum dolor sit amet, consectetur adipiscing elit. Duis vel congue diam, ac congue diam. Duis ut nulla non sapien vehicula sagittis sed eget lectus.
All of the static content, like jpegs, pngs and gifs are stored in the same directory as the blog posts and can be easily fetched with the basic markdown syntax.
For all other content that comes into mind, if not supported, you can always use plain HTML to add it to the blog post, since we are dealing with MDX/JSX.
The future
I can say I’m very pleased with the result. The Google PageSpeed scores are maxed out.

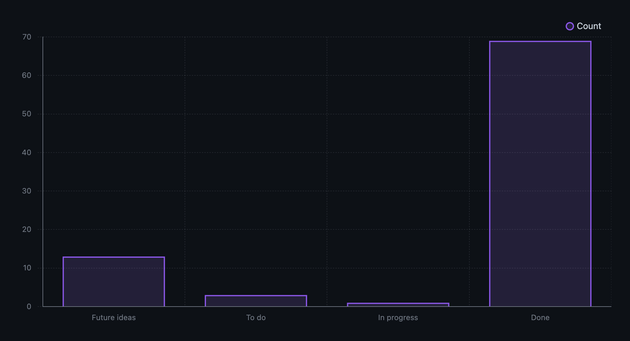
I have total control over my blog, which allows me to add new features over time. Here is my GitHub Projects basic stats graph which shows how many tasks I have in each phase.

Since I loved Gatsby so much, the decision was made not only to create a blog but a whole personal website. I’ve even implemented dark/light mode switching which can be found in the footer.
If you would like to see more content like this, leave a ❤️.


